Producer Guides
Everything you need to set up a great listing and grow with Markit — in the order that gets you selling fastest. Tap any guide to expand it.
1. Getting Started as a Producer
Markit is a marketplace that lives on a map. Shoppers open the app, see local farms, bakeries, makers, and markets as pins, and tap through to what's in stock right now. Here's the whole path to a complete listing:
- Add your place — the pin shoppers tap.
- Add great photos — and frame them so they look sharp everywhere.
- Stock your inventory — what you sell, with prices and availability.
- Connect Square (optional) — auto-sync your catalog and take orders.
- Set your business location — this quietly unlocks your analytics.
- Open your Producer Dashboard (Premium) — see local demand and pricing.
Free vs. Premium. Everything you need to sell — places, products, photos, Square sync, and ordering — is free. Premium adds the Producer Dashboard: the Search Explorer (a heatmap of what shoppers near you search for) and the Market Price Index (your prices vs. nearby sellers).
One thing that decides whether shoppers find you: keywords. When you create places and products, Markit suggests search terms as tappable chips. Nothing is added automatically — you accept the ones that fit. Each keyword is another search you can show up in.
2. Add Your Place to the Map
Your place is the pin shoppers tap — your farm, market stall, storefront, or pickup spot. Everything else hangs off it.
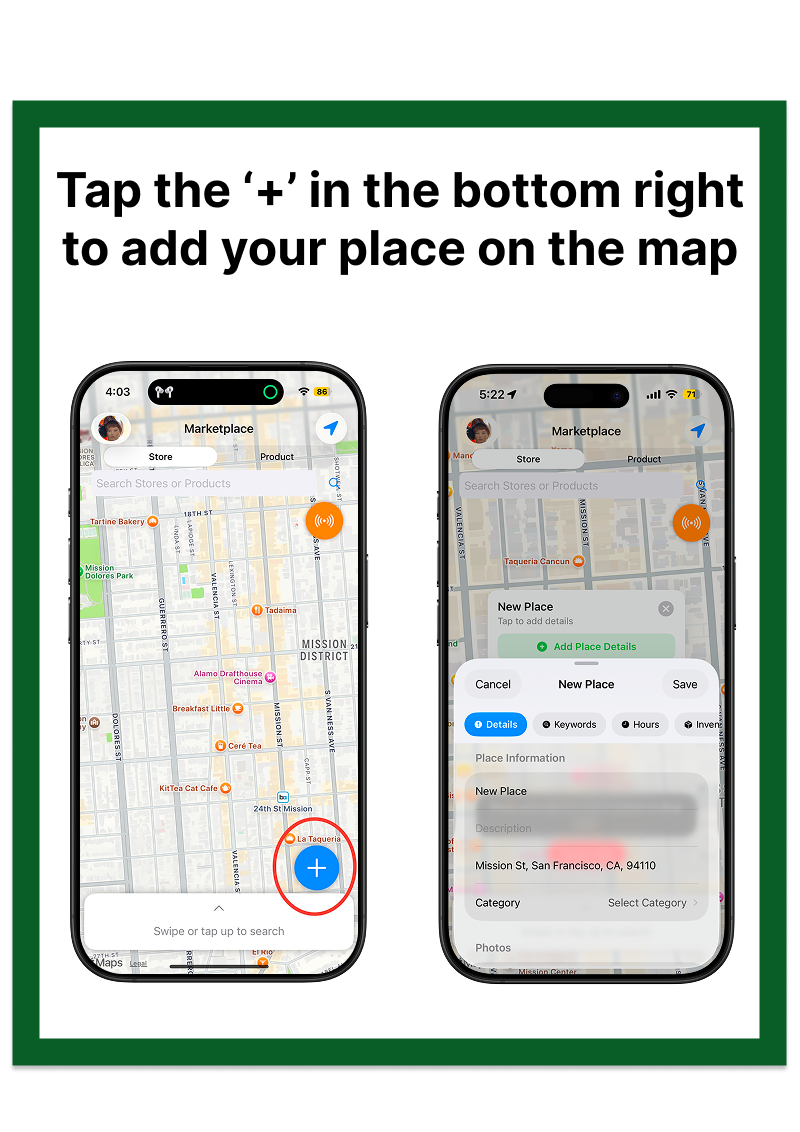
- On the map, tap the blue + button (bottom-right).
- Give your place a name — what shows on the pin and in search results.
- Set the location — drag the map or search an address so the pin is exact.
- Pick a category. This sets your map pin's icon and suggests relevant keywords.
- Add a short description of what you sell.
- Set your hours. Your pin shows green when you're open and in stock, red when closed. No hours = treated as closed.
- Tap Save.
Accept your keywords. When you choose a category, Markit offers suggested keyword chips. Tap the ones that describe you — that's what makes you appear in searches like "sourdough" or "eggs." Be generous but honest.
Tip: one place per physical location. Selling at three markets? That's three places, each with its own hours and stock.
3. Make Your Photos Look Great (Focal Points)
Photos are the biggest driver of taps. You can add up to 5 photos per place — and, the part almost everyone misses, choose exactly which part of each photo shows when it's cropped into a pin or list thumbnail.
Adding photos
- Open your place and tap Edit.
- In the photos row, tap + to pick up to 5 photos. The first is your hero image.
Photos are resized and optimized automatically on upload — no need to shrink them first.
The part people miss: framing with focal points
Markit shows your photos in different shapes in different places — a wide hero, a square-ish thumbnail, a small map crop. When a wide photo is squeezed into a square, something gets cut off. By default that's the center, which often isn't the good part.
- Tap the small crop icon in the corner of any photo you've added.
- Drag the highlighted area over the most important part — the loaf, the face, the storefront sign.
- The live preview shows how it'll be framed in lists and on your pin.
- Tap Done.
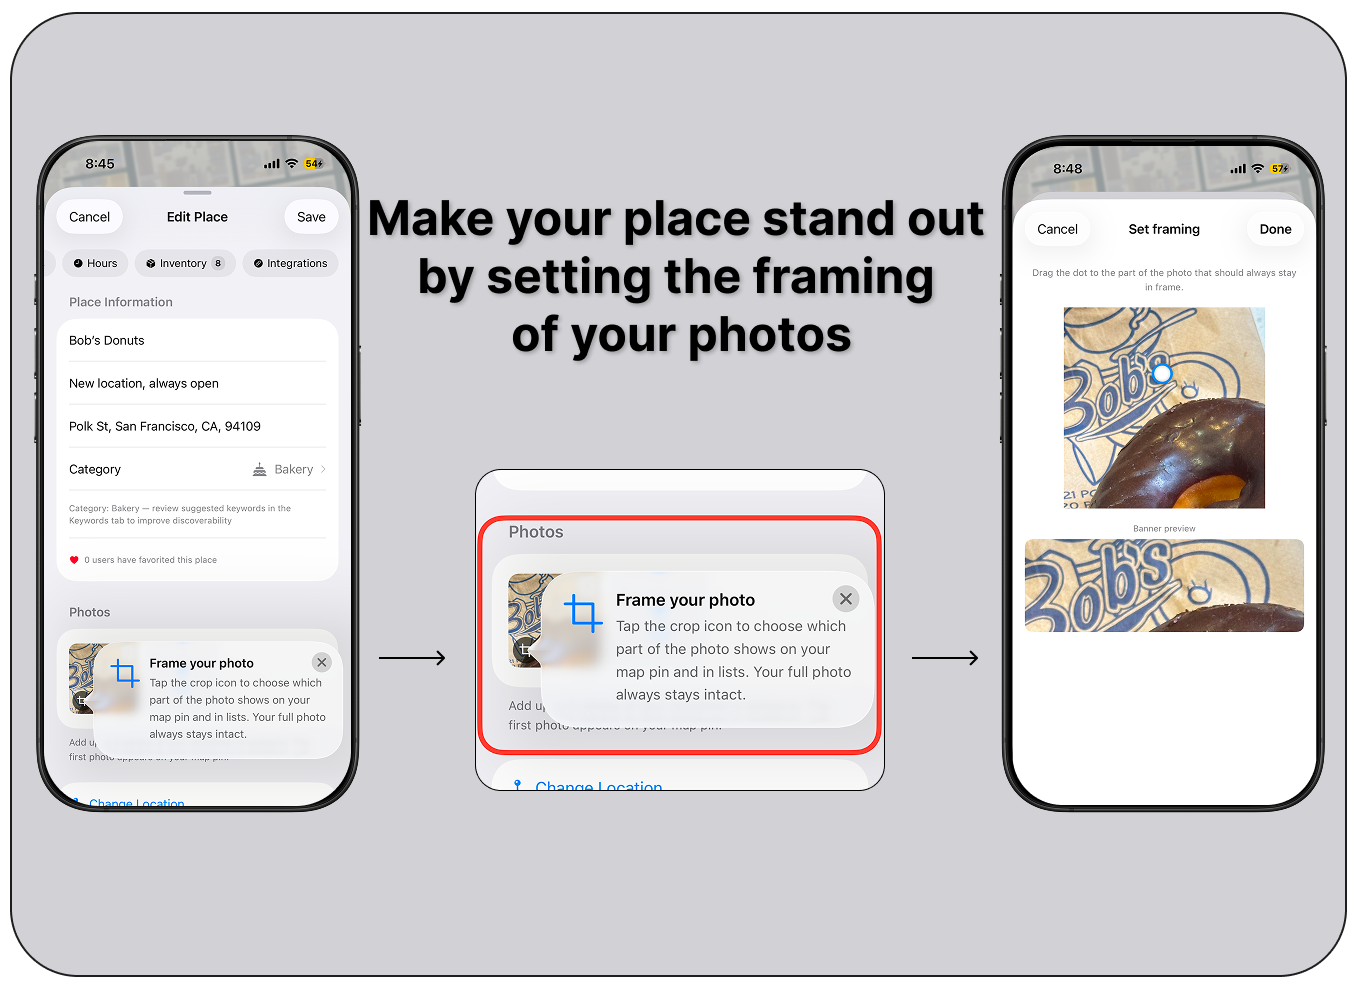
Why it matters. A centered crop of a wide barn photo might show empty sky. Set the focal point on the barn door and the good part is what shoppers see — the difference between a tap and a scroll-past. The crop only affects previews; your full, uncropped photo always shows when someone taps it.
Tip: set a focal point on every photo, especially wide or tall ones. The same framing carries to the web map, so your listing looks intentional everywhere.
4. Build Your Inventory & Catalog
Markit has two related ideas worth understanding up front:
- A product is the thing you make — "Sourdough Loaf." It lives in your catalog once and carries the name, photo, category, UPC/SKU, keywords, and ingredients.
- An inventory item is that product at a specific place, with the details that change per location: price, quantity, unit, and availability.
So one Sourdough Loaf can be $7 and in stock at your Saturday market, and sold out at your shop — one product, two inventory entries. Edit the product once and it updates everywhere it's stocked.
Adding an item to a place
- Open your place and tap Edit.
- Tap Add Item — create a new product, or add an existing one from your catalog.
- Set the price, quantity (or mark it Made to Order), and unit (per loaf, per dozen, per lb).
- Set availability. Out-of-stock items still show (greyed) so shoppers know you carry them.
- Save.
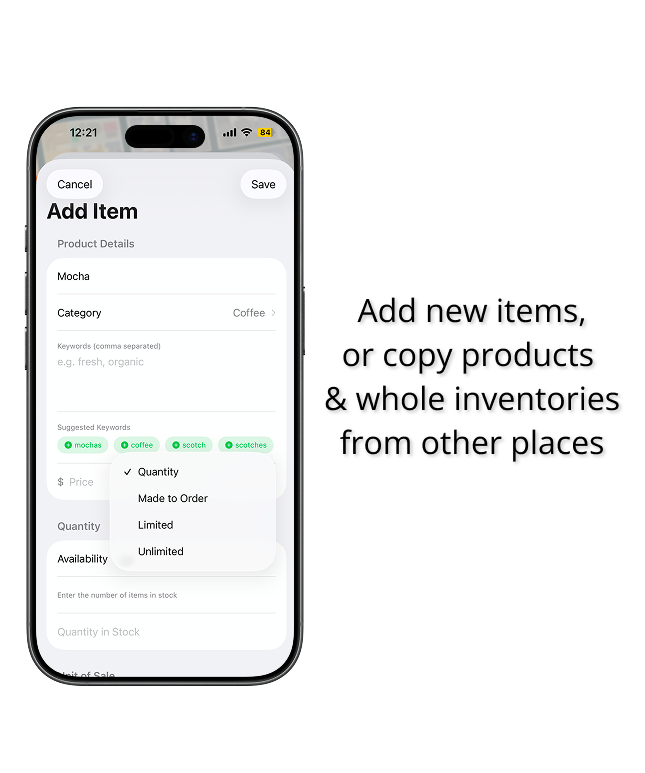
Keywords, again. Place search and product search are separate. A shopper searching "gluten free" only finds your product if you accepted a matching keyword chip. Twenty seconds of chips per product is the cheapest visibility you'll get.
Tip: reuse products across places instead of recreating them — your catalog stays clean and edits propagate.
5. Connect Square: Sync Inventory & Take Orders
Already running on Square? Connect it once and Markit pulls your catalog in automatically — no re-typing prices and products — and can let shoppers place orders right from your listing. Optional, but the biggest time-saver in the app if you use Square.
- Syncs your catalog → Square items become Markit products and inventory.
- Keeps your manual items → syncing merges, it never wipes what you added by hand.
- Enables ordering (opt-in, per place) → an "Order via Square" button on synced items.
Your Square login and tokens are handled securely on our servers — the app never sees or stores your Square password or card data.
Step 1 — Connect your Square account
- Go to your profile / My Business.
- Tap Connect Square.
- A secure Square sign-in opens — log in and authorize Markit.
- You'll return to the app showing Square connected.
Step 2 — Link a location
- Choose which Square location maps to your Markit place.
- Confirm — this tells Markit which catalog and stock levels to pull.
Step 3 — Sync your inventory
- Tap Sync Inventory.
- Markit imports your items: sizes become units ("Large 18″", "12 oz"), true variants stay named ("Pepperoni"), and items Square doesn't track stock for sync as Made to Order.
- Re-run sync anytime your Square catalog changes — it merges, so your manual items are safe.
Step 4 — Turn on ordering (optional)
- Open the place and tap Edit.
- Flip on Enable Ordering (requires a linked Square location — that's why steps 2–3 come first).
- Save. Synced items now show "Order via Square", which opens a secure Square payment link.
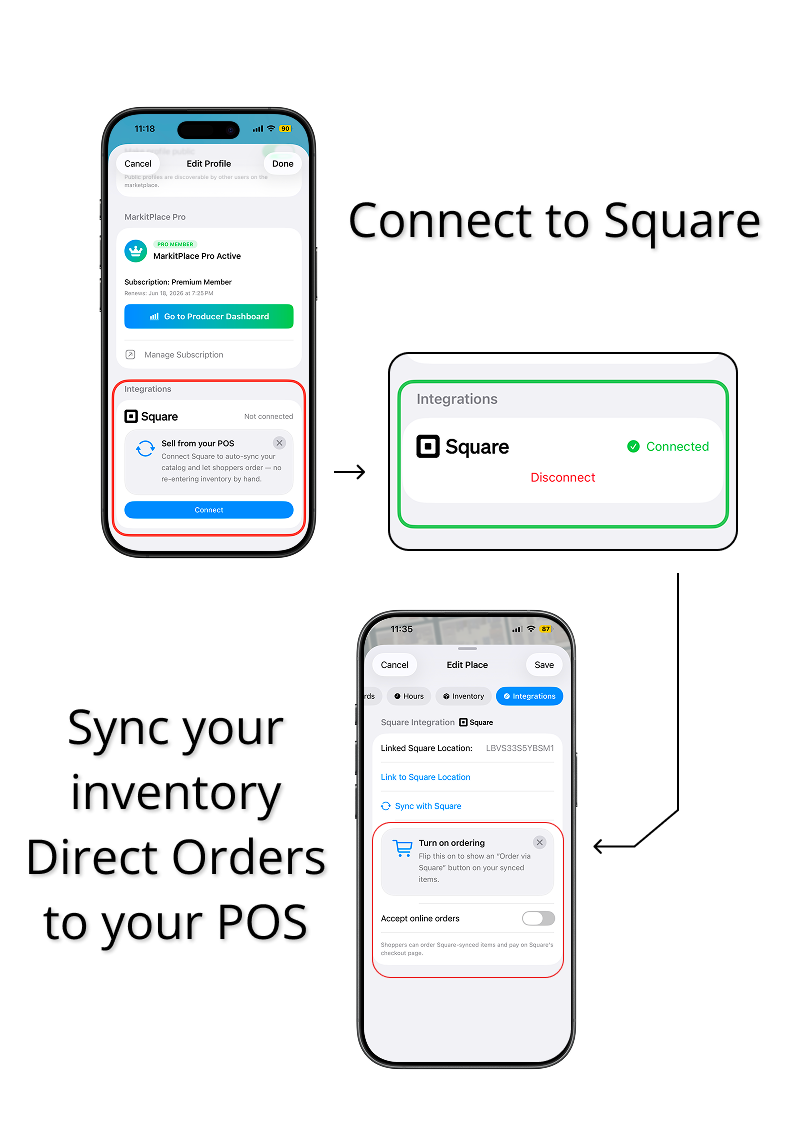
Troubleshooting. "Enable Ordering" greyed out? You haven't linked a Square location yet (Step 2). An item didn't sync? Make sure it's in the catalog for the linked location, then sync again. You can disconnect anytime from My Business → Disconnect Square.
6. Set Your Business Location
The shortest step here, and the easiest to skip — but skipping it leaves your Producer Dashboard empty, because your analytics are anchored to where your business is.
Why your dashboard needs it. The Search Explorer maps shopper searches around your location, and the Market Price Index compares your prices to sellers near you. No location → no center point → both come up empty. When the app says "searches near your location," this is the location it means.
- Open your profile and tap Edit Profile.
- On the Profile tab, in the About section, find the location row and tap Change Location.
- A map opens — drag it (or search an address) so the marker sits on your business or the center of the area you serve.
- Confirm, then Save your profile. You'll see your coordinates listed once it's set.
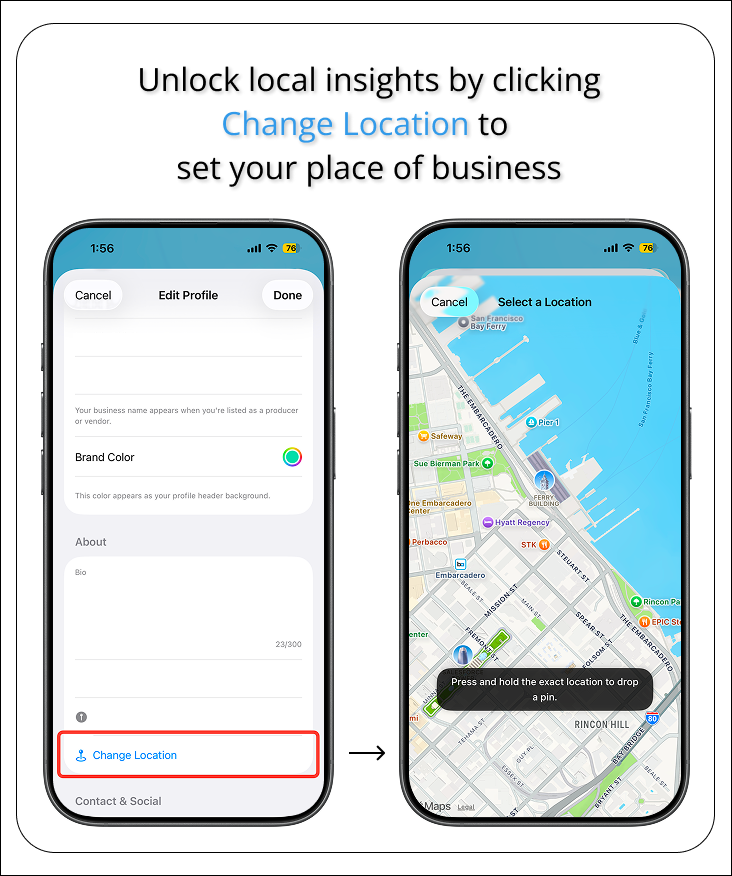
Tip: if you sell across a region, drop the pin in the middle of where your customers are, not necessarily at your house. The dashboard's "near you" radius works outward from this point.
7. Your Producer Dashboard (Premium)
The Producer Dashboard turns real shopper behavior near you into things you can act on: what to stock, what to call it, and what to charge. It's a Premium feature.
Before you start: make sure you've set your business location. The whole dashboard is anchored to it — without it, every tab is empty.
- Open your profile menu and choose Producer Dashboard.
- Not subscribed yet? You'll see what Premium unlocks and can start a free trial.
- Once subscribed, the dashboard opens to three tabs.
Overview
Your performance at a glance — views, favorites, and engagement trends over the last week or month.
Search Explorer
A heatmap of what shoppers near you are searching for — the most valuable tab.
- Top Local Searches — the most-searched terms around your business.
- Top Missed Searches — searches that returned zero results nearby. This is literal demand with no supply: if "fresh pasta" keeps coming up missed and you can make it, that's your next product.
My Products → Market Price Index
Pick one of your products and see how your price compares to nearby sellers of similar items — so you can price confidently instead of guessing. This tab also surfaces your most-favorited items and places.
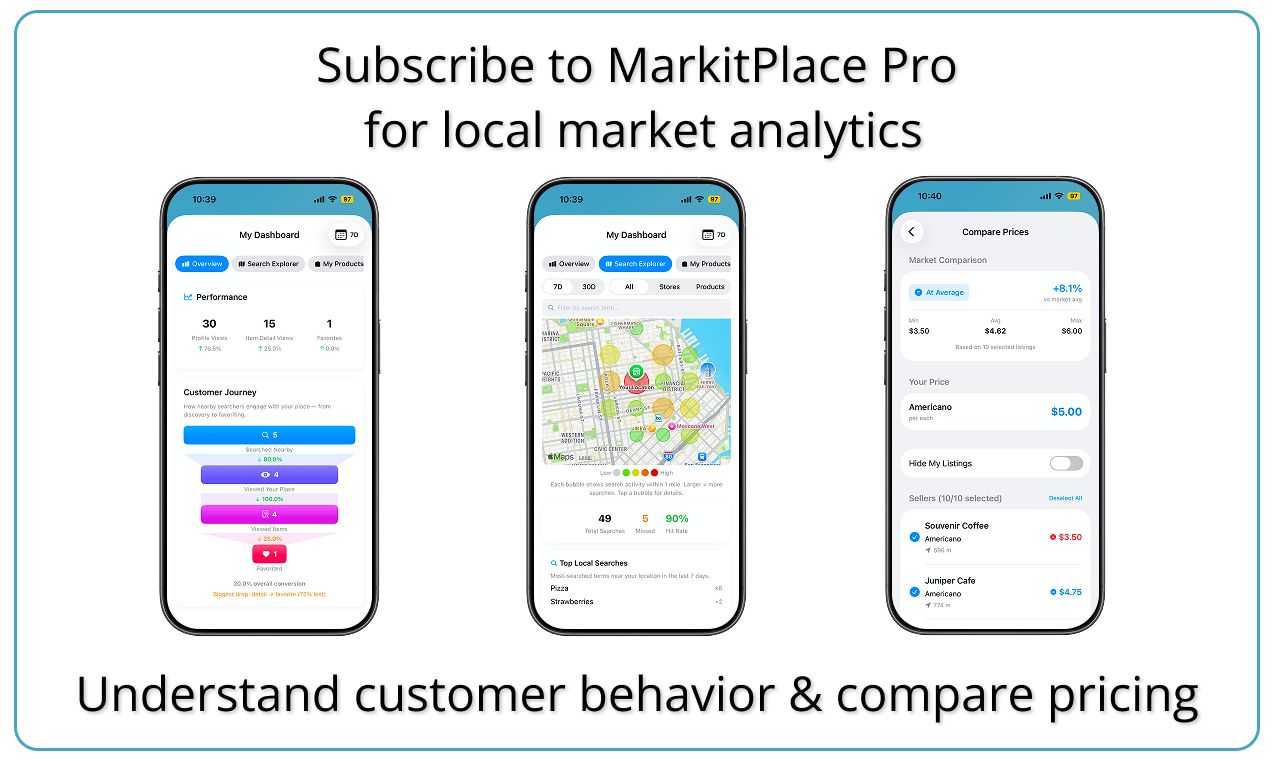
Getting the most out of it. Check Missed Searches weekly — it's the fastest path to "what should I make next." Then close the loop: take the exact words shoppers use and add them as keywords on your listings.
Premium is a monthly or yearly subscription with a free trial, managed through your Apple ID settings. Cancelling keeps all your places, products, and orders — you just lose the analytics tabs.
Still need help?
Can't find what you're looking for? Visit Support or email our team at team@markitplace.org — we typically respond within 1–2 business days.